Tuesday 28 April 2015

How To Block App & Game Requests On Facebook - 2015

There are two different ways to block particular game request on Facebook. I will explain both of them to you. Follow any of the method which like or find easy to do.

#1 Method:-


  • First of click on the top right side settings icon in your profile.
  • Then click on the settings option.
 
  • After that click on the option of blocking available on the left side panel of settings page.
  • In Blocking Page there are many options available which are required to block different functionality.
Two blocking option which required are 

#1 Block App invite 
If is useful if you want to block any particular friend. Once you block that person then you will not receive further invitation of request and apps from that person. So if you want to block multiple person who send invitation then you need to add his or her name in the block user box.


#2 Block Apps 
 In case multiple friends are sending you same game or app request then there is an option for block app. Simply type the name of that app in the block app box and you have done.


#2 Method:- 
If case you don't want to follow explained method or you want to try another way which may be find easy as compare to above. 


  • First of open Games App center.
  • Then click on the activity option available on the top menu.

  • Now you will be able to see all the pending invites from your friends.
  • Simply click on the Cross "X" or Ignore All button appear on the app request.
  •  Click to block app or game request and confirm it.
So above explained are the two different ways to block any app request or game request easily on Facebook without any extension or script. Follow any of the above given method you like most and find easy. In case you face any kind or issue, don't feel any kind of hesitation to leave your comments.

Thanks to Safe Tricks

Monday 27 April 2015

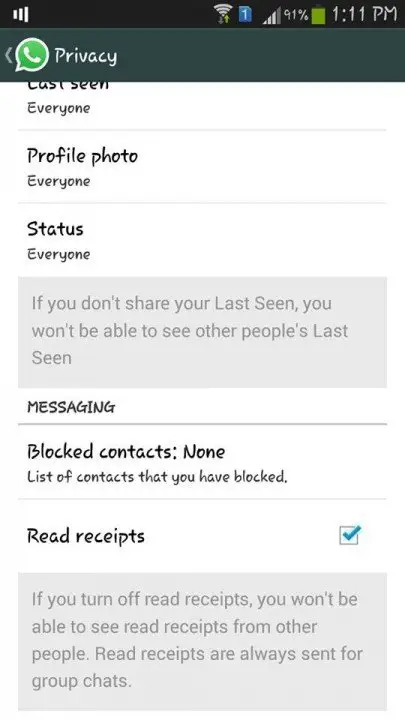
How to disable WhatsApp Message Blue mark Read Receipts

A quietly released feature that might have destroyed many friendships by now, created tumult. Considering the disappointment, WhatsApp released a new update where you can now “Disable” the read receipts feature.
read receipts
WhatsApp version 2.11.44 or later for Android brings the feature for you. If you’ve updated your app just head over to WhatsApp > Settings > Account > Privacy. Uncheck the Read Receipt checkbox and you’re done.
This works similar to the last seen feature. If you’ve turned if off then on one will able to see if you’ve ignored their message. However, in turn, even you’ll not be able to see if the other person has ignored your message.
Currently this feature is only available for Android. If you’re an iPhone user, WhatsApp will soon push an update for you as well. In case if you have jailbroken you can download the “WhatsApp Read Receipt Disabler” tweak from Cydia which works the same way.
If you haven’t updated your WhatsApp on Android, we highly recommend you to do so. Disabling read receipts so far the best feature WhatsApp has ever gave us.

Saturday 25 April 2015

How to Get Serial Key of Any Software

How to Get Serial Key of Any Software

The key 94FBR is a part of  Office 2000 Pro CD activation key that is widely distributed as it bypasses the activation requirements of Office 2000 Pro. By searching for 94fbr and the product name, you are guarantee that the pages that are returned are pages dealing specifically with the product you're wanting a serial for. Follow simple steps given below to Find the Serial Key of Any Software.

  1. Go to Google
  2. Then type Software Name 94FBR
  3. Replace Software Name with the name of software whose serial key you want to find
  4. Eg: To find serial key of Nero I will type Nero 94fbr
  5. Now press Enter and you will find serial key of software you are looking for as shown below.
google%2Btrick%2Bto%2Bfind%2Bserial%2Bkey

How To Change Facebook Name Before 60 Days Limit

How To Change Facebook Name Before 60 Days Limit

Follow the below given steps accordingly to make Facebook name change 60 days.
  • First of all sign in to your Facebook account.
  • The go to Account setting and click Edit Name option. 
  • Here make sure that name changing limit is appearing. If limit is present you will see notification like this upon clicking your name.
You can't change your name right now because you've already changed it within the last 60 days. Learn more.
  • After that go to Report Compromised Account Service by clicking Here.
  • Here you will have to re-enter your password and to continue.
  • Then you have to change your account password. Don't change other info like email, mob etc.
  • After that you can see list of name which you have recently changed. Select any name and click Continue.
  • Done! You have successfully changed your Facebook Name Before 60 days limit.


Note: By this method you can change your Facebook name by selecting any of the name from recently changed names but you cannot create a new one. After that only two options left, one is to fill Request Form or to wait for 60 days completion.

YOU CAN ALSO WATCH THIS VIDEO:
http://youtu.be/h4rYiKfr5Fc

Friday 24 April 2015

Hide WhatsApp Images & Videos That Are Appearing in Gallery

#1 Hide Your WhatsApp Media from iOS Devices

iPhone users with WhatsApp installed on their mobile will
  • First of all, go to Settings and tap on Privacy button.
  • Tap on Photos and then you will have different sources of Photos simply you need to look for Whatsapp and ones you found it then toggle it off.
  • Now all the Photos and Videos that are received from WhatsApp will not be found in your device Gallery.

#2 Hide Your WhatsApp Media from Android Devices

As all Android users feels this irritating because these images and videos will be stored in Gallery.
Just follow this simple steps to hide WhatsApp media from gallery.
  • Download any File Manager app on your Android phone which is required for this process, ES File Explorer.
  • After installing, Head over to SD card under the Home section and clickWhatsApp and press Media.
  • Now you will see a WhatsApp folder, press and hold that folder and you will get a option to rename that particular folder.
  • Just put a before the folder name, and this would look like this.
.Whatsapp Images
  • And similarly for WhatsApp video folder.
.Whatsapp Videos
Now all the media that are received from WhatsApp will be hidden, and in order to get back all those media to your gallery, just simply remove the .[dot] from the renamed folder as like original folder.

Monday 20 April 2015

How to delete a contact on imo? (not blocking)


you can also see it on youtube:
https://www.youtube.com/watch?v=rxSjiBooIyY

1. At First Open IMO

2. Select the person, you want to  delete


3.Click on name.


4. Then it will open like this. Click on the gear icon.

5.Click the delete button, you will appear confirmation message to delete.


6.Just click the yes.

Saturday 18 April 2015

10 Useful Android Tips & Tricks [You Should Know]

Whether you are new to Android and eager to try out every available option you see on the screen, or familiar with the system, including the annoyances that plague you on a daily basis, tips and tricks to get around a system is always helpful. We are here to help you with that.
Image
In this post, we are featuring 10 useful Android tips and tricks that may improve your experience while using your Android device. Do note that the steps may vary a little from one Android phone to another due to the differences in the build and the OS version, but if you play around with it, the next step isn’t too far off.

1. Disable App Notifications

Bugged by annoying app notifications that just keep coming? If you don’t know already, these app notifications also drain your phone’s battery. If you want to turn them off, and you are on Jelly Bean 4.1 and above, here’s how:

  • On any of your unwanted notifications in your notification bar, long press on the notification for a message box to appear.
  • Tap on App Info > Untick Show Notifications > OK.
Image

2. Disable Mobile Data

Whenever you don’t need to stay connected, disabling the Mobile Data can help keep your smartphone battery from draining too quickly. Turning off mobile data is as easy as:

  • Going to Settings > Data Usage.
  • Disable Mobile data by toggling the setting from ON to OFF.
Image

3. Set Mobile Data Limit

Want to keep track of how far your usage is from your monthly mobile data limit? If you have ICS and above, there is a feature which lets you keep track of how much of the quota you have left.

  • Head over to Settings > Data Usage.
  • Set your data limit by dragging the orange line to reflect your monthly quota.
  • Set your data usage cycle based on when your "month" starts and ends, and you’re done.
You will be alerted once you hit the limit you have set. Note that the tracked data usage of your phone may vary slightly than your carrier’s tracking.
Image

4. Add Multiple Google Accounts

You need a Google account to use an Android phone but did you know you can choose to run more than one Google account on your Android device. This is convenient if you use more than one account for several of your Google services. To add multiple Google accounts:

  • Go to Settings > Add account.
  • Select Google and setup your New or Existing Google account.
  • Once added, choose what you want to sync with the account.
Repeat all the steps above if you want to add more accounts.
Image

5. Disable automatic App Updates

Prefer to read through app permissions and manually pick which app updates to adopt? You can, but first you need to disable your automatic app updates. Here are the steps:

  • Open Play Store and head over to Settings.
  • Tap on Auto-update apps.
  • Choose Do not auto-update apps.
If you want to enable the auto updates, follow the same path and choose Auto-update apps at any time or via Wi-Fi (available for certain Android devices only).
Image
To update your apps manually, just open Play Store, and on the main page swipe in from the left and tap on My apps. You can tap on apps with pending updates and update them manually, or if you like to update them all at once, just tap on Update All.

6. How To Check For android System updates

For Android users that are using stock ROM, you may want to look for new updates to your system. To check for updates:

  • Go to Settings > About phone/tablet.
  • Tap on System updates.
  • Tap Check now to look for system updates.
Image

7. Changing Default Apps

If you have already set some default apps for particular tasks (e.g. using Chrome for opening web links) but wish to change this:

  • Go to Settings > Apps.
  • Swipe right and look for the All tab.
  • Select the app you want to remove as default.
  • Tap on Clear defaults.
Image

8. Organize Homescreen Shortcuts With Folders

Once you have a lot of apps installed, your homescreen might be filled with app shortcuts. Unlike the app drawer, the apps on your home screen are not arranged alphabetically. So, you might want to create some folders for your homescreen shortcuts.

  • Assuming you have more than a handful of shortcuts already on your homescreen, long press on any of the shortcuts and drag it onto another shortcut.
  • A circle should now appear around the apps, indicating that a folder has been created.
  • By tapping on the newly created folder, a mini window will pop up with your apps in it.
  • You can drag and drop additional apps into the folder if you like. You can also rename the folder by tapping on the text area at the bottom of the mini window.

Zoom in (real dimensions: 500 x 493)Image

9. Disable Animations

Here’s a tip on how to make your Android device run a bit smoother: disable its animations. You will need to have access to Developer Options which can be found under Settings or About device.

Note: For some phones, you may need to go to Build number and tap on it repeatedly until you see "You are now a developer!". Developer options are now enabled.

Under enabled Developer options, look for Window animation scale, Transition animation scale, and Animator duration scale. Then, turn them off (disable) them one at a time.
Image

10. How to Turn Off Auto-Correction

Hate the fact that your phone is going English teacher mode on you? Turn off auto-correction for peace of mind when texting.

  • Go to Settings > Language & input.
  • Tap on the settings icon next to the keyboard that you are using, e.g. Google Keyboard.
  • Look for Auto-correction and tap on it.
  • Select Off to turn auto-correction off.
Image